
< この記事をシェア >
muninにてMySQL関連を監視項目に追加する方法です。
muninが元から持っているプラグインで使用できるmysql周りのものは↓になります。
・MySQL Connections
・MySQL queries
・MySQL Queries in cache
・MySQL slow queries
・MySQL threads
・MySQL throughput
また↑に加え、mysql_qcacheやmysql_connectionsを追加したい場合はgithubにお世話になります。
munin備え付けのMysql監視プラグインを追加
といってもmuninでmysql監視やるぞーという意味でpluginsフォルダ下にあるmysql関連のものをリンクしてやるだけです。
ln -s /usr/share/munin/plugins/mysql_ /etc/munin/plugins/mysql_commands
ln -s /usr/share/munin/plugins/mysql_ /etc/munin/plugins/mysql_slow
ln -s /usr/share/munin/plugins/mysql_bytes /etc/munin/plugins/mysql_bytes
ln -s /usr/share/munin/plugins/mysql_innodb /etc/munin/plugins/mysql_innodb
ln -s /usr/share/munin/plugins/mysql_isam_space_ /etc/munin/plugins/mysql_isam_space_
ln -s /usr/share/munin/plugins/mysql_queries /etc/munin/plugins/mysql_queries
ln -s /usr/share/munin/plugins/mysql_slowqueries /etc/munin/plugins/mysql_slowqueries
ln -s /usr/share/munin/plugins/mysql_threads /etc/munin/plugins/mysql_threads
qcache、mem、connectionsを追加する
こっちはgithubから持ってきてリンクします。
cd /usr/share/munin/plugins
wget https://raw.github.com/munin-monitoring/contrib/master/plugins/mysql/mysql_qcache
wget https://raw.github.com/munin-monitoring/contrib/master/plugins/mysql/mysql_qcache_mem
wget https://raw.github.com/munin-monitoring/contrib/master/plugins/mysql/mysql_connections
ln -s /usr/share/munin/plugins/mysql_qcache /etc/munin/plugins/mysql_qcache
ln -s /usr/share/munin/plugins/mysql_qcache_mem /etc/munin/plugins/mysql_qcache_mem
ln -s /usr/share/munin/plugins/mysql_connections /etc/munin/plugins/mysql_connections
プラグインファイル(munin-node)の修正
最後に
vi /etc/munin/plugin-conf.d/munin-node
munin-nodeのプラグインファイルに↓を追加します。
[mysql_*]
env.mysqlopts -u 【ユーザー名】 -p【パスワード】
env.mysqladmin /usr/bin/mysqladmin
env.mysqlconnection DBI:mysql:mysql;host=127.0.0.1;port=3306
env.mysqluser 【ユーザー名】
env.mysqlpassword 【パスワード】
MySQLのユーザー名、パスワード、ポート、ホストを指定する必要があります。
ポートがデフォルトで自分がMySQLを持っているDBサーバーなのでここではhost=127.0.0.1;port=3306としています。
↑どちらの設定も完了後はmunin-nodeを再起動する必要があります。
/etc/init.d/munin-node restart
できあがりはこんな感じ
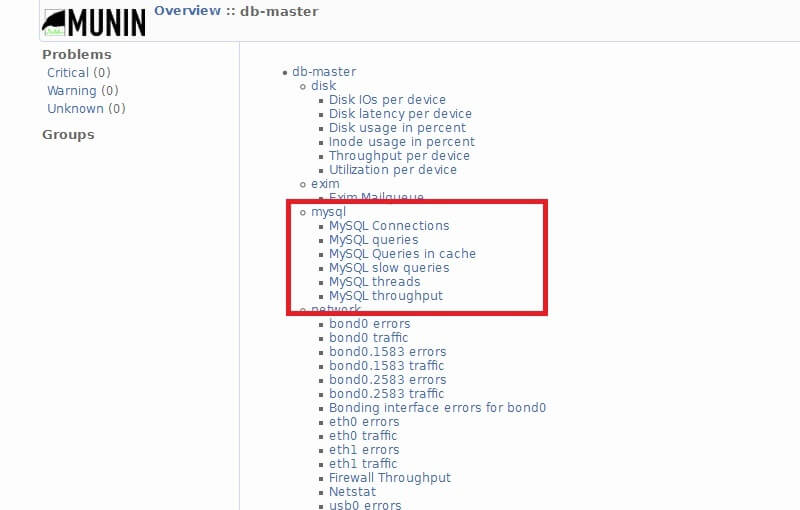
munin監視が実行された後、muninのUI上にmysqlの項目が登場しているのがわかります。
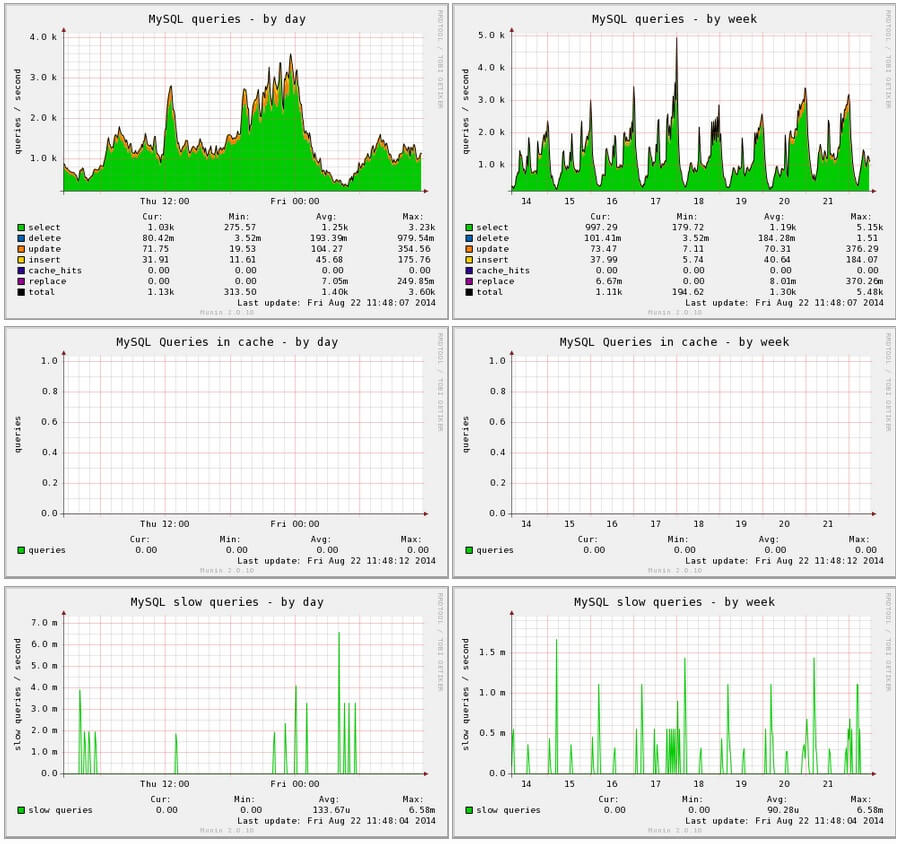
ちゃんとグラフも生成されています。
muninのMysql監視を入れておけば、DBサーバーとして動いているサーバーの監視もラクチンになるので設定しておきましょー
< この記事をシェア >
\\どうかフォローをお願いします…//
このmuninでDBサーバー(MySQL)の監視を行う設定方法の最終更新日は2014年8月22日です。
記事の内容に変化やご指摘がありましたら問い合わせフォームまたはusedoorのTwitterまたはusedoorのFacebookページよりご連絡ください。

【毎日5%~7%還元!!】Yahoo!ショッピング『PayPay支払いで毎日5%貯まる』キャンペーンでおトクに買い物する方法 – 条件などまとめ
Yahoo!ショッピングで毎日5%還元となるキャンペーンが開催!プレミアム会員などは常時7%還元も。対象となる買い物の条件などまとめ

【楽天モバイル】三木谷氏の紹介キャンペーンで14,000ポイントをもらって回線を契約する方法。超おトクに契約できるけど注意点あり
楽天の社長、三木谷氏のRakuten最強プラン紹介キャンペーンを利用すればのりかえ契約で14,000ポイント、新規契約は11,000ポイントがもらえる!ただし、現在は特典付与は1人1回まで。

【ドコモ】『オンラインショップおトク割』でスマホをおトクに購入する方法 – 端末のみ購入もOK!対象機種、割引金額、適用条件まとめ
ドコモオンラインショップが新たな割引「オンラインショップおトク割」をスタート!5G WELCOME割併用で超大幅割引となる機種も!

Amazonで『ギフトカード大還元祭』開催!対象のお店でAmazon Pay利用で1回ごとに最大10,000円分のギフトカードが当たる抽選に参加できる&回数上限なし
Amazon Payを対象店舗で1回1,000円以上利用すると必ずAmazonギフトカードが当たる抽選に参加できる「ギフトカード大還元祭」開催!期間は6月7日(金)まで

【最大5,000円相当が無料でもらえる】Yahooショッピング、PayPayモールで買い物して「ウェルカムギフト」をもらう方法 – 対象となる条件などまとめ
はじめてまたは久々にYahooショッピング、PayPayモールで買い物する人は5,000円相当の商品が詰まったウェルカムギフトがもらえる!
記事を書くヤル気が出るのでフォローよろしくお願いしますm(._.)m


【LINE】無料スタンプ&隠しスタンプまとめ(2026年7月14日更新)ダウンロード方法&取得条件
現在配布されているLINEの無料スタンプ&隠しスタンプを徹底まとめ!スタンプを無料ゲットできる条件や取得するまでの手順、有効期限など

【最大20,000dポイント】運試しに。ドキドキキーワードあみだくじでdポイントをゲットする方法 – 毎週火曜日更新。今週のキーワードは?
超簡単に参加できるクジ。当たればラッキー!dアカウント+ポイントカード持っている人は是非!今週のキーワードも紹介しています

【2026年7月】『エディオン スペシャルセール』でおトクに買い物する方法 – 激安商品も!楽天市場店の不定期開催セールにログインする手順(旧:闇市)
エディオン楽天市場店で不定期開催される『スペシャルセール(旧:エディオン闇市)』には価格.com最安値クラスの商品が登場することも!

【2026年7月】楽天市場『お買い物マラソン』でおトクに買い物する方法 – 買い回りでポイントアップのコツやクーポン、スロット、間違い探し、注意点などまとめ
楽天市場の買いまわりポイントアップの祭典『お買い物マラソン』に参加してみた。最大付与ポイントをゲットするまでの手順を紹介

【2026年も登場】LINEのトーク上に「父の日」背景を表示させる方法&表示されない場合の対処方法【お父さんに感謝のメッセージ】
LINEのトーク画面の背景にブラウンが黄色い花を持ってお父さんに感謝を伝える隠し背景が今年も登場!2026年の隠しワードは「父の日」以外にも複数あることを確認
usedoorをフォロー
注目・おすすめ記事


ワイモバイルで折りたたみスマホ「Libero Flip」をおトクに購入する方法 – 一括9,800円&PayPayポイント還元で購入できる
ワイモバイルの折りたたみスマホ「Libero Flip(A304ZT)」が値下げ!機種変更でも一括9,800円と激安!!さらに必ずPayPayポイントがもらえる

【ポケモンGO】アプリを起動しなくても距離をカウントする『いつでも冒険モード』の設定方法 – Pokemon GO Plusとの違い、比較
ついにアプリ画面を開いていなくてもポケモンGO内の距離がカウントされるモードが登場!ポケモンGOプラスユーザーも設定しておくことをオススメします

ahamo、LINEMO、povoどれにする?開催中キャンペーンの特典と条件を比較してみた – キャッシュバックやポイント還元などまとめ
ドコモのahamo、ソフトバンクのLINEMO、auのpovo、。大容量低価格プランを今契約するならどこが一番おトクにキャンペーンで契約できる?を比較してみた

【機種変更でも一括1,430円!!】ドコモのガラケー「arrows ケータイ ベーシック(F-41C)」を超激安で購入する方法
ドコモのarrowsブランドのパカパカガラケーが機種変更orのりかえで一括1,430円という爆安で販売中!通話用にガラケーはいかが?
最新記事&ニュース
【LINE】無料スタンプ&隠しスタンプまとめ(2026年7月14日更新)ダウンロード方法&取得条件
現在配布されているLINEの無料スタンプ&隠しスタンプを徹底まとめ!スタンプを無料ゲットできる条件や取得するまでの手順、有効期限など
【最大20,000dポイント】運試しに。ドキドキキーワードあみだくじでdポイントをゲットする方法 – 毎週火曜日更新。今週のキーワードは?
超簡単に参加できるクジ。当たればラッキー!dアカウント+ポイントカード持っている人は是非!今週のキーワードも紹介しています
【2026年7月】『エディオン スペシャルセール』でおトクに買い物する方法 – 激安商品も!楽天市場店の不定期開催セールにログインする手順(旧:闇市)
エディオン楽天市場店で不定期開催される『スペシャルセール(旧:エディオン闇市)』には価格.com最安値クラスの商品が登場することも!
【2026年7月】楽天市場『お買い物マラソン』でおトクに買い物する方法 – 買い回りでポイントアップのコツやクーポン、スロット、間違い探し、注意点などまとめ
楽天市場の買いまわりポイントアップの祭典『お買い物マラソン』に参加してみた。最大付与ポイントをゲットするまでの手順を紹介
【2026年も登場】LINEのトーク上に「父の日」背景を表示させる方法&表示されない場合の対処方法【お父さんに感謝のメッセージ】
LINEのトーク画面の背景にブラウンが黄色い花を持ってお父さんに感謝を伝える隠し背景が今年も登場!2026年の隠しワードは「父の日」以外にも複数あることを確認
usedoorをフォロー
現在開催中の"おトク"なセール、キャンペーン、お買い得アイテムまとめ

【楽天モバイル】三木谷氏の紹介キャンペーンで14,000ポイントをもらって回線を契約する方法。超おトクに契約できるけど注意点あり
楽天の社長、三木谷氏のRakuten最強プラン紹介キャンペーンを利用すればのりかえ契約で14,000ポイント、新規契約は11,000ポイントがもらえる!ただし、現在は特典付与は1人1回まで。

【LYPプレミアム】特典、利用できるLINEの機能まとめ&おトクに登録できるキャンペーンを紹介。無料期間延長&最大5,000円相当のPayPay特典がもらえる!
対象者であればLYPプレミアムに新規登録で無料期間延長&最大5,000円分の特典がもらえるキャンペーン開催中!使えるLINEの機能やおトク要素をまとめて紹介

【裏技?】ahamoを契約して最大20,000dポイントをもらう方法 – ドコモSIMのみ契約⇒即ahamoへのプラン変更でポイントが付与された
ドコモのSIMを単体契約⇒即ahamoにプラン変更で最大20,000dポイントがもらえる!直接ahamoで契約するよりもかなりおトクに

Kindle Unlimitedにおトクに登録できるキャンペーンまとめ – Amazonの本・雑誌読み放題をおトクに契約する方法
Amazonの読み放題サービス「Kindle Unlimited」のキャンペーンをまとめています。12月1日までブラックフライデー連動キャンペーンで3ヵ月間99円!